Introduction
All right, I've decided to start development but it's not enough just to write the code. I also should be able to build the packages, test them somehow, provide some documentation and do many other activities. But firstly, I don't want to make a lot of routine work by myself. Let the machine do that for me. Also, I want to be sure that the way the system works for me locally is the same as for any other machine. And eventually, I don't want to keep the source code only locally. It's unsafe as my local machine can be damaged and all information would be lost in this case. So, we need some additional software which makes the development infrastructure and which should be configured in the way convenient to use.
This article is about to describe the infrastructure setup as well as how to configure all this software to point to each other.
Development infrastructure requirements
Before start development we should identify how we are going to use our tool set. Also, we should describe how we are going to achieve our regular builds on demand by single click or entering single command.the entire infrastructure should include:
- build engine which drives through entire build process from collecting source code to publish binaries which are ready to use
- source control system which is responsible for file storage and versioning
- various systems for static code analysis
- systems for automated Documentation generation
- test engine and entire layer of tests
- the layer of scripts integrating all above systems into common pipeline
The build is considered to be successful in case it meets the following requirements:
- the code is compilable
- all static analysis checks pass that without any errors
- all tests are passed
- binaries of the system itself
- published components
- published documentation
- published release notes containing the log of changes since previous published build
Tool set and integration
Here is the preliminary sequence of the tool set definition I made for this project:
- Since core part of the solution is Java-based (all other languages are used for client side) the infrastructure should be more targeted to Java infrastructure. So, as the development environment the Eclipse (Juno) was selected. The criteria is simple: it's free and easy to install/start working + it can be used not only for Java but also for many other languages including Python, Ruby, PHP, Perl etc.
- Since I'm working on the project which would be shared I need some workspace where the sources would be hosted. For that purpose I've created GitHub repository here. That defined the source control system I have to use then. It's Git.
- As the build engine the ANT was taken (I was thinking about Maven but ANT appeared to be more friendly for setup on my machine).
- And all this stuff should run under continuous integration system. For that purpose I took Jenkins. I used that many times before and it's quite convenient to setup on local machine. But in the future it's OK to use something else if there's proper candidate for that.
- From the tracking point of view I took Jira instance (I have one installed on my machine). Github has it's own tracker. But at this time when the Sirius solution is very raw (and at the moment I'm the only committer) it's too early to publish all those tasks oficially. Nobody cares but space is taken.
- As for other languages, at the beginning I took Ruby and C#. So, Ruby code is written in Eclipse, built by Rake and published using Gem utility. For C# the same roles are done by Visual Studio, MSBuild and NuGet respectively
| Language | IDE | Build engine | Package Manager | Source Control | Tracking system | CI Tool |
|---|---|---|---|---|---|---|
| Java | Eclipse | Ant | N/A | GIT | JIRA | Jenkins |
| Ruby | Rake | Ruby Gem | ||||
| C# | Visual Studio | MSBuild | NuGet |
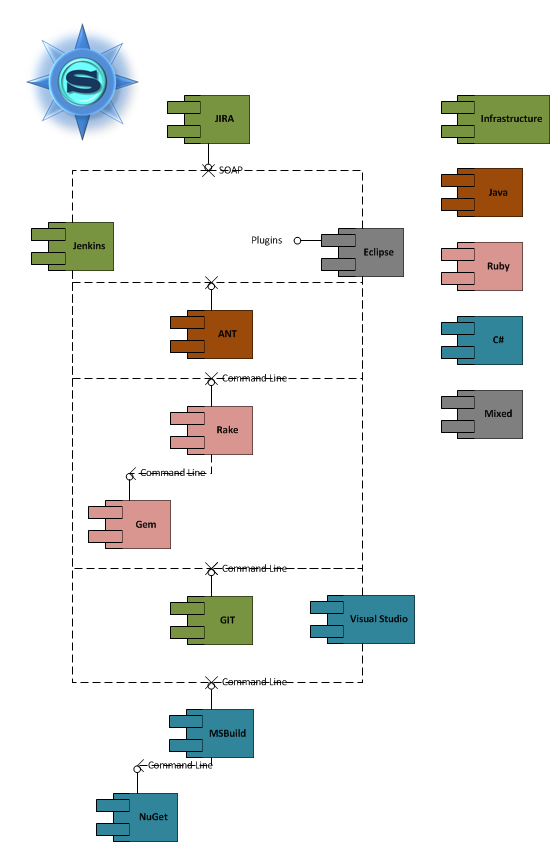
- Git
- Eclipse - most of the setup is related to the plugins. Nothing else special is needed
- ANT - requires more detailed description as we'll make sample build scripts for the project
- Ruby components - there's nothing to say about them separately but together they require a solid portion of work to do in order to make setup
- C# infrastructure
- Jenkins - once we set up local builds we're ready to make continuous integration builds
- JIRA - generally I would concentrate on settings we have to do in terms of infrastructure we build. I don't want to describe the entire projects configuration
Git setup
All right, I've registered on GitHub and created my own repository here. That would be server end-point for the source control.
Next step is Git installation. Any Git installation googles within several seconds. E.g. it can be downloaded from here: http://git-scm.com/downloads. For windows, during installation you'll be prompted whether we want to use Git bash or it can be used within standard command line as well. I choose second option as I'm going to use it from command line (while integrating with Jenkins).
After installation is done I can open Git bash console and make initial checkout. For my project it can be done by the following command:
git clone git@github.com:mkolisnyk/Sirius.git <My Location>That will create local repository at <My Location> folder. But it's not the most interesting thing. During clone operation you'll be asked for user credentials. Once you entered them successfully and repository is cloned you'll have RSA keys generated and stored at the %USERPROFILE%\.ssh folder. That would be the keys to use while communicating with Git.
Also, you should make additional settings if you want to make non-SSH authentication (in the future it will help me dealing with Jenkins). Just follow instructions here for that purpose.
Configuring Eclipse
Installing software updates
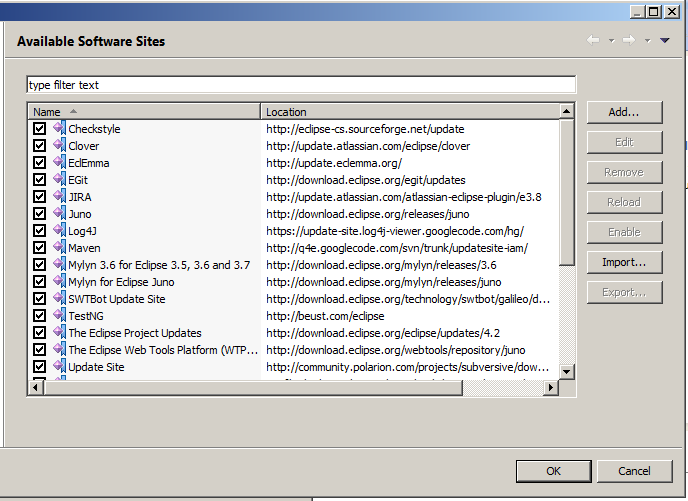
Once we installed Eclipse we should setup additional plugins as base complectation is not enough for our tasks. The general work flow for plugin setup is:
- In the Eclipse window select menu Help > Install New Software
- In the Install dialog click on Add button > the new update site dialog appears
- Enter site name (any name) and put the location of update site
- Click OK
- The list of available updates will be populated. Just set all necessary checkmarks and click on Next button
- Follow installation instructions
| Plugin Name | Update site |
|---|---|
| EGit | http://download.eclipse.org/egit/updates |
| TestNG | http://beust.com/eclipse |
| Subversive | http://www.eclipse.org/subversive/installation-instructions.php |
| Log4J viewer | https://update-site.log4j-viewer.googlecode.com/hg/ |
| Checkstyle | http://eclipse-cs.sourceforge.net/update |
| Jira | http://update.atlassian.com/atlassian-eclipse-plugin/e3.8 |
Setting up communication with Git
Once we have Git plugin installed we're ready for repository checkout. Before doing anything with Git integration we should make sure the Eclipse references to proper RSA keys. That's needed for authentication. For this purpose:
- In the Eclipse go to menu Window > Preferences
- In the Preferences window navigate to General > Network Connections > SSH2 menu.
- The dialog should contain something like:

- Make sure that the path references to your %USERPROFILE%\.ssh folder and acceptable file names are: id_rsa, id_dsa as it's shown on the picture
For this purpose we need to do the following:
- Open Git repository browsing perspective. Select menu Window > Open Perspective > Other and select Git Repository Exploring item. Click OK.
- The Git Repository view appears. Select Clone Git Repository button on the topmost toolbar as it's seen on screen shot example

- After that we should select URI item in the Select Repository Source

- The dialog appears where we should enter Git repository information. Actually, it's enough to put just URI. All other fields will be populated accordingly. As the result, we'll get the following view:

- Click Next to proceed with clone operation
Prepare base ANT script
The Eclipse installation already includes ANT plugin installed. So, we just can take and use it. But before that we should identify what we should implement with it. The entire build process should go through the following stages:
- Collect sources
- Compile
- Run Tests
- Generate documentation
- Publish binaries
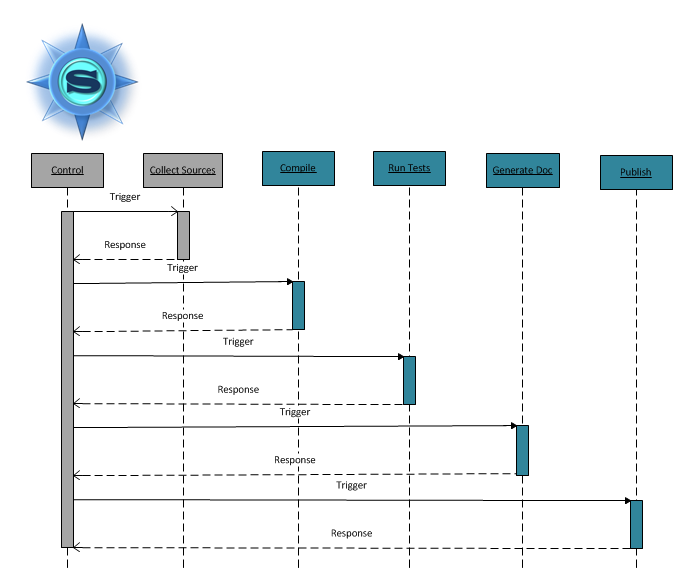
Good news in all that stuff is that we don't have to write ANT script from the scratch. We can take existing project and perform the following actions:
- In the Eclipse right click on project you want to generate build file for and select Export
- In the Export dialog select General > Ant buildfile and click on Next
- Specify the build file name (if it differes from the build.xml), select projects to export and click on Finish button.
<?xml version="1.0" encoding="UTF-8" standalone="no"?>
<!-- WARNING: Eclipse auto-generated file.
              Any modifications will be overwritten.
              To include a user specific buildfile here, simply create one in the same
              directory with the processing instruction <?eclipse.ant.import?>
              as the first entry and export the buildfile again. --><project basedir="." default="build" name="SiriusJavaClient">
    <property environment="env"/>
    <property name="ECLIPSE_HOME" value="../../../../eclipse"/>
    <property name="debuglevel" value="source,lines,vars"/>
    <property name="target" value="1.7"/>
    <property name="source" value="1.7"/>
    <path id="SiriusJavaClient.classpath">
        <pathelement location="bin"/>
        <pathelement location="lib/axis.jar"/>
        <pathelement location="lib/commons-discovery-0.2.jar"/>
        <pathelement location="lib/javax.wsdl_1.6.2.v201012040545.jar"/>
        <pathelement location="lib/jaxrpc.jar"/>
        <pathelement location="lib/org.apache.commons.logging_1.1.1.v201101211721.jar"/>
        <pathelement location="lib/saaj.jar"/>
    </path>
    <target name="init">
        <mkdir dir="bin"/>
        <copy includeemptydirs="false" todir="bin">
            <fileset dir="src">
                <exclude name="**/*.java"/>
            </fileset>
        </copy>
    </target>
    <target name="clean">
        <delete dir="bin"/>
    </target>
    <target depends="clean" name="cleanall"/>
    <target depends="build-subprojects,build-project" name="build"/>
    <target name="build-subprojects"/>
    <target depends="init" name="build-project">
        <echo message="${ant.project.name}: ${ant.file}"/>
        <javac debug="true" debuglevel="${debuglevel}" destdir="bin" includeantruntime="false" source="${source}" target="${target}">
            <src path="src"/>
            <classpath refid="SiriusJavaClient.classpath"/>
        </javac>
    </target>
    <target description="Build all projects which reference this project. Useful to propagate changes." name="build-refprojects"/>
    <target description="copy Eclipse compiler jars to ant lib directory" name="init-eclipse-compiler">
        <copy todir="${ant.library.dir}">
            <fileset dir="${ECLIPSE_HOME}/plugins" includes="org.eclipse.jdt.core_*.jar"/>
        </copy>
        <unzip dest="${ant.library.dir}">
            <patternset includes="jdtCompilerAdapter.jar"/>
            <fileset dir="${ECLIPSE_HOME}/plugins" includes="org.eclipse.jdt.core_*.jar"/>
        </unzip>
    </target>
    <target description="compile project with Eclipse compiler" name="build-eclipse-compiler">
        <property name="build.compiler" value="org.eclipse.jdt.core.JDTCompilerAdapter"/>
        <antcall target="build"/>
    </target>
</project>
Actually, there is some stuff we're not interested in, e.g. the Eclipse related build actions. But the most interesting targets for us are:
- init
- clean
- build
- Run various tests
- Generate javadoc documentation
- Pack binaries and publish them
Run tests
Testing activities are represented with two types of tasks: static code analysis and unit tests execution. They both require separate activities though they can easily be bound to common pipeline.Unit tests
As the test engine the TestNG is used. And there's dedicated ANT task for that. More detailed description of it with working examples can be found at the dedicated page. In our case we have to do 2 things:- Add TestNG library to the lib folder and include it in class path property. For server side it looks like:
 <path id="Server.classpath">
  <pathelement location="bin" />
  <pathelement location="lib/testng-6.8.jar" />
 </path>
- Add the task which is responsible for running tests from specified location. For server side it looks like:
 <target depends="build" name="test">
  <taskdef name="testng" classname="com.beust.testng.TestNGAntTask"
   classpath="lib/testng-6.8.jar" />
  <testng classpathref="Server.classpath" outputDir="test-output"
   haltOnFailure="false" verbose="2">
   <classfileset dir="bin/org/sirius/server/system/tests"
    includes="**/*Test.class" />
  </testng>
 </target>
Here we run tests located at bin/org/sirius/server/system/tests location but it can be replaced to any other path.
Static analysis
For static analysis I use Check Style. As you remember, we mentioned that during Eclipse setup. But that time that was just plugin. This time we need all set of binaries. So, we should download binaries and put them into lib folder. I've made a separate lib\stylecheck sub-folder and placed the binaries there.After that we do the following:
- Add new class path entry for check style:
 <path id="Checkstyle.classpath">
  <pathelement location="lib/stylecheck/*.jar" />
 </path>
- Add ANT target performing style checking for all class files:
 <target depends="build" name="checkstyle">
  <taskdef resource="checkstyletask.properties" classpath="lib/stylecheck/checkstyle-5.6-all.jar" />

  <checkstyle config="lib/stylecheck/sun_checks.xml"
   classpathref="Checkstyle.classpath" failOnViolation="false">
   <fileset dir="src" includes="**/*.java" />
   <formatter type="plain" />
   <formatter type="xml" toFile="publish/checkstyle-result.xml" />
  </checkstyle>
 </target>
Generate Javadoc
Javadoc is build-in utility supplied with JDK and it's located in default JDK location. Also, there's dedicated ANT task in standard package. The only problem is that sometimes ANT doesn't find it. To resolve this problem we Just should add JDK path into PATH environment variable. The appropriate target looks like:
 <target depends="build" name="javadoc">
  <javadoc destdir="publish/doc" author="true" version="true"
   use="true" windowtitle="Server Side API reference">

   <packageset dir="src" defaultexcludes="yes">
    <include name="org/sirius/server/**" />
    <exclude name="org/sirius/server/system/tests/**" />
   </packageset>

   <doctitle><![CDATA[<h1>Server Side API reference</h1>]]></doctitle>
   <bottom><![CDATA[<i>Copyright © 2000 Dummy Corp. All Rights Reserved.</i>]]></bottom>
   <tag name="todo" scope="all" description="To do:" />
   <group title="Group 1 Packages" packages="com.dummy.test.a*" />
   <group title="Group 2 Packages" packages="com.dummy.test.b*:com.dummy.test.c*" />
   <link offline="true" href="http://download.oracle.com/javase/6/docs/api/"
    packagelistLoc="C:\tmp" />
   <link
    href="http://developer.java.sun.com/developer/products/xml/docs/api/" />
  </javadoc>
 </target>
Publish binaries
At this stage we already have binaries and documentation generated. So, the last stage is just to pack all those items. For my project I'll make 2 archives:
- Executable JAR file for application code. For client there would be no executable
- Archived documentation
 <target depends="checkstyle,test,javadoc" name="package">
  <jar destfile="publish/packages/sirius-server-${package.version}.jar"
   basedir="./bin">
   <fileset dir="./bin">
    <exclude name="**/*Test.class" />
   </fileset>
   <restrict>
    <name name="**/*.class" />
    <archives>
     <zips>
      <fileset dir="./lib" casesensitive="yes">
       <include name="**/*.jar" />
       <exclude name="**/stylecheck/*.jar" />
      </fileset>
     </zips>
    </archives>
   </restrict>
   <manifest>
    <attribute name="Built-By" value="${user.name}" />
    <attribute name="Implementation-Vendor" value="Sirius Org." />
    <attribute name="Implementation-Title" value="Sirius" />
    <attribute name="Implementation-Version" value="0.1 alpha" />
    <attribute name="Main-Class" value="org.sirius.server.Starter" />
   </manifest>
  </jar>
  <zip destfile="publish/packages/sirius-server-${package.version}-doc.zip"
       basedir="publish/doc"  />
 </target>
In the above example there are some highlighted items. I wanted to point out to the following moments:
- The parts highlighted with red show the areas we exclude from archiving. It's check style libraries and test classes. We don't need them in final binaries
- The yellow highlighted part show the manifest content. This manifest will be generated and placed into JAR file. And that's the place where we define what the entry point is
- Parts highlighted with green contain reference to package.version which is not yet defined. It will be used while integrating the build with Jenkins
Finalized build script
After all settings and some small corrections we have a build script like:
<?xml version="1.0" encoding="UTF-8" standalone="no"?>
<!-- WARNING: Eclipse auto-generated file. Any modifications will be overwritten.
 To include a user specific buildfile here, simply create one in the same
 directory with the processing instruction <?eclipse.ant.import?> as the first
 entry and export the buildfile again. -->
<project basedir="." default="package" name="Server">
 <property environment="env" />
 <property name="ECLIPSE_HOME" value="../../../../eclipse" />
 <property name="debuglevel" value="source,lines,vars" />
 <property name="target" value="1.7" />
 <property name="source" value="1.7" />
 <path id="Server.classpath">
  <pathelement location="bin" />
  <pathelement location="lib/testng-6.8.jar" />
  <pathelement location="lib/log4j-1.2.9.jar" />
 </path>

 <path id="Checkstyle.classpath">
  <pathelement location="lib/stylecheck/*.jar" />
 </path>

 <target name="init">
  <delete dir="bin" />
  <mkdir dir="bin" />
  <copy includeemptydirs="false" todir="bin">
   <fileset dir="src">
    <exclude name="**/*.java" />
   </fileset>
  </copy>
  <delete dir="Test" />
  <delete dir="publish" />
  <mkdir dir="publish" />
  <mkdir dir="publish/doc" />
  <mkdir dir="publish/packages" />
 </target>
 <target name="clean">
  <delete dir="bin" />
 </target>
 <target depends="clean" name="cleanall" />
 <target depends="build-subprojects,build-project" name="build" />
 <target name="build-subprojects" />
 <target depends="init" name="build-project">
  <echo message="${ant.project.name}: ${ant.file}" />
  <javac debug="true" debuglevel="${debuglevel}" destdir="bin"
   includeantruntime="false" source="${source}" target="${target}">
   <src path="src" />
   <classpath refid="Server.classpath" />
  </javac>
 </target>
 <target
  description="Build all projects which reference this project. Useful to propagate changes."
  name="build-refprojects" />
 <target description="copy Eclipse compiler jars to ant lib directory"
  name="init-eclipse-compiler">
  <copy todir="${ant.library.dir}">
   <fileset dir="${ECLIPSE_HOME}/plugins" includes="org.eclipse.jdt.core_*.jar" />
  </copy>
  <unzip dest="${ant.library.dir}">
   <patternset includes="jdtCompilerAdapter.jar" />
   <fileset dir="${ECLIPSE_HOME}/plugins" includes="org.eclipse.jdt.core_*.jar" />
  </unzip>
 </target>
 <target description="compile project with Eclipse compiler"
  name="build-eclipse-compiler">
  <property name="build.compiler" value="org.eclipse.jdt.core.JDTCompilerAdapter" />
  <antcall target="build" />
 </target>


 <target depends="build" name="javadoc">
  <javadoc destdir="publish/doc" author="true" version="true"
   use="true" windowtitle="Server Side API reference">

   <packageset dir="src" defaultexcludes="yes">
    <include name="org/sirius/server/**" />
    <exclude name="org/sirius/server/system/tests/**" />
   </packageset>

   <doctitle><![CDATA[<h1>Server Side API reference</h1>]]></doctitle>
   <bottom><![CDATA[<i>Copyright © 2000 Dummy Corp. All Rights Reserved.</i>]]></bottom>
   <tag name="todo" scope="all" description="To do:" />
   <group title="Group 1 Packages" packages="com.dummy.test.a*" />
   <group title="Group 2 Packages" packages="com.dummy.test.b*:com.dummy.test.c*" />
   <link offline="true" href="http://download.oracle.com/javase/6/docs/api/"
    packagelistLoc="C:\tmp" />
   <link
    href="http://developer.java.sun.com/developer/products/xml/docs/api/" />
  </javadoc>
 </target>

 <target depends="build" name="test">
  <taskdef name="testng" classname="com.beust.testng.TestNGAntTask"
   classpath="lib/testng-6.8.jar" />
  <testng classpathref="Server.classpath" outputDir="test-output"
   haltOnFailure="false" verbose="2">
   <classfileset dir="bin/org/sirius/server/system/tests"
    includes="**/*Test.class" />
  </testng>
 </target>

 <target depends="build" name="checkstyle">
  <taskdef resource="checkstyletask.properties" classpath="lib/stylecheck/checkstyle-5.6-all.jar" />

  <checkstyle config="lib/stylecheck/sun_checks.xml"
   classpathref="Checkstyle.classpath" failOnViolation="false">
   <fileset dir="src" includes="**/*.java" />
   <formatter type="plain" />
   <formatter type="xml" toFile="publish/checkstyle-result.xml" />
  </checkstyle>
 </target>

 <target depends="checkstyle,test,javadoc" name="package">
  <jar destfile="publish/packages/sirius-server-${package.version}.jar"
   basedir="./bin">
   <fileset dir="./bin">
    <exclude name="**/*Test.class" />
   </fileset>
   <restrict>
    <name name="**/*.class" />
    <archives>
     <zips>
      <fileset dir="./lib" casesensitive="yes">
       <include name="**/*.jar" />
       <exclude name="**/stylecheck/*.jar" />
      </fileset>
     </zips>
    </archives>
   </restrict>
   <manifest>
    <attribute name="Built-By" value="${user.name}" />
    <attribute name="Implementation-Vendor" value="Sirius Org." />
    <attribute name="Implementation-Title" value="Sirius" />
    <attribute name="Implementation-Version" value="0.1 alpha" />
    <attribute name="Main-Class" value="org.sirius.server.Starter" />
   </manifest>
  </jar>
  <zip destfile="publish/packages/sirius-server-${package.version}-doc.zip"
       basedir="publish/doc"  />
 </target>
</project>
Set up Ruby components
Ruby setup is done with the following steps:
- Install Ruby and ruby gems
- Setup Eclipse for Ruby programming
- Prepare build script
Install Ruby and ruby gems
Firstly we need to download Ruby Installer and run it. It will setup Ruby binaries to specified location.
Next step is to install additional Ruby modules. Firstly, we should update Ruby with the most recent RubyGems. Once we have Ruby installed we can open command prompt and run the following command:
gem install rubygems-updateAfter that we can install the following packages (use "gem install <package_name>" command to install them):
- rake - for making automated builds
- rdoc - update to the latest version of documentation generator
- handsoap, savon, httpclient - some of them may be needed for HTTP communications
*** LOCAL GEMS ***

akami (1.2.0)
bigdecimal (1.1.0)
builder (3.1.4)
gyoku (0.4.6)
handsoap (1.1.8)
httpclient (2.3.0.1)
httpi (1.1.1)
io-console (0.3)
json (1.5.4)
minitest (2.5.1)
nokogiri (1.5.5 x86-mingw32)
nori (1.1.3)
rack (1.4.1)
rake (10.0.3)
rdoc (3.12, 3.9.4)
rubygems-update (1.8.24)
savon (1.2.0)
soap4r (1.5.8, 1.5.7)
wasabi (2.5.1)
Setup Eclipse for Ruby programming
Actually, to make sure that we can run Ruby applications we should make sure that we installed appropriate plugin. The toolkit for Ruby programming can be found within general updates for Eclipse (update site is http://download.eclipse.org/releases/juno). To find Ruby updates you should:
- In the Eclipse go to Help > Install New Software
- In the list of available sites select the update site mentioned before (NOTE: for Eclipse versions different from Juno the update site address should be different only by last path)
- Perform usual setup and restart Eclipse
- Navigate to Window > Preferences menu
- In the Preferences dialog navigate to Ruby > Interpreters item in the left navigation tree view
- If the empty list appears click on Add button. You should see the screen like:

- Specify existing Ruby location and click OK
- Confirm all changes.
Prepare build script
It's time to create Ruby client project and add build script for it. For this purpose we can do the following steps:
- Select File > New > Other menu item in the Eclipse
- Select Ruby > Ruby Project in the select wizard window and click Next
- Enter project name and click on Finish
- At the root of the project create new empty file and name it Rakefile
Packaging is done by Gem:PackageTask class. Here is the example of Rakefile which makes package based on GEM specification passed:
require 'rubygems/package_task'

  spec = Gem::Specification.new do |s|
    s.platform = Gem::Platform::RUBY
    s.summary = "Sirius Ruby client"
    s.name = "sirius-client"
    s.version = "0.0" #ENV['ruby.client.ver']
    s.requirements = "none"
    s.files = FileList["core/**/*.rb", "Rakefile"]
    s.homepage = "http://github.com/mkolisnyk/Sirius"
    s.description = "The client for Sirius system"
    s.authors="Myk Kolisnyk"
    s.email="kolesnik.nickolay@gmail.com"
  end

  Gem::PackageTask.new(spec) do |pkg|
  end
Task definition itself is empty but usually it has several flags identifying if files should be archived or not. We don't need that for now.
Ruby setup appeared to be quite simple. But that's mostly because we didn't do anything very essential with it yet. Anyway, let's move on and make the same settings for C#.
Set up C# infrastructure
Firstly, when we work with C# technology stack we should install Visual Studio. Well, it's not the only IDE for C# but it's the most popular and widely used as well as we're also interested with it's plugins not just the base system. So, the first step is to make Visual Studio installation. Default setup is enough. Also, it's enough to use Professional version (I'm not going to use anything special which is outside of Professional edition scope) but if you have Premium or Ultimate edition it would be even better.
With Visual Studio we have almost everything in the box except:
- Integration with GIT
- Integration with package manager
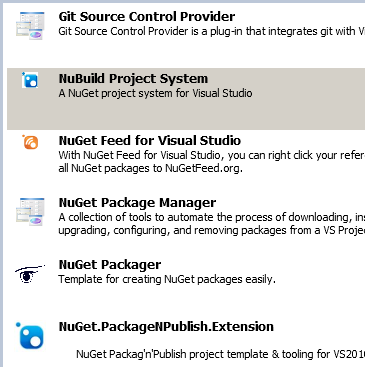
GIT
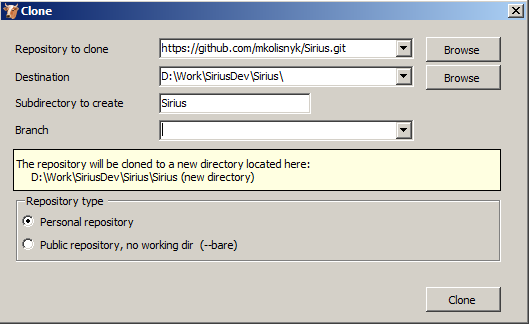
Once we're installed plugins we should clone repository. When we have Git plugin installed the new Git menu appears on the Visual Studio screen. So, we either can choose Git > Clone Repository to initiate clone operation. Thus, we just have to fill the dialog like:
NuGet
Once we're integrated with Git it's time to reserve the space for NuGet. I've installed different plugins and at least 3 of them have appropriate package wizard project. For my solution I did the following:
- Right-click on solution icon and select Add > New Project
- From the project type list select NuGet Packager
- Enter project name (for me it's Sirius.CSharp.Client) and click OK
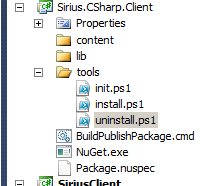
- nuget.exe - this is the major executable which will do all "magic" with packaging
- package.nuspec - the specification file containing basic package information as well as paths to files which should be included into the package
- BuildPublishPackage.cmd - batch file which accepts version number and optionally the flag indicating that build should be published. For current needs we just should have an ability to make the package.
The only file from the above list which requires modification is Package.nuspec file. Initially only basic template is generated for this file and we have to update it to reflect our package specifics. For now this file looks like:
<?xml version="1.0"?>
<package >
  <metadata>
    <id>Sirius.CSharp.Client</id>
    <version>0.0.0</version>
    <authors>Myk Kolisnyk</authors>
    <owners>Myk Kolisnyk</owners>
    <projectUrl>https://github.com/mkolisnyk/Sirius</projectUrl>
    <requireLicenseAcceptance>false</requireLicenseAcceptance>
    <description>
      C# client library for Sirius system
    </description>
    <releaseNotes>
    </releaseNotes>
    <tags></tags>
  </metadata>
  <files>
    <file src="content\**" target="content" />
  </files>
</package>
In the future I'll update that file to point to proper resources as well as I'll add some additional information. But for this article the above example would be enough to understand the concept.
MSBuild
The build script should perform 2 major operations:
- Build the solution
- Create package
<?xml version="1.0" encoding="utf-8" ?>
<Project ToolsVersion="4.0" DefaultTargets="Build;Package" xmlns="http://schemas.microsoft.com/developer/msbuild/2003">
  <PropertyGroup>
    <Configuration Condition=" '$(Configuration)' == '' ">Debug</Configuration>
    <Platform Condition=" '$(Platform)' == '' ">x86</Platform>
    <ProductVersion Condition=" '$(ProductVersion)' == '' ">0.0.0</ProductVersion>
  </PropertyGroup>
  <Target Name="Build">
    <MSBuild Projects="..\Sirius.Client.csproj" />
  </Target>
  <Target Name="Package">
    <Exec Command="..\Sirius.CSharp.Client\BuildPublishPackage.cmd ${ProductVersion}" WorkingDirectory="..\Sirius.CSharp.Client" />
  </Target>
</Project>
So, that's it for now. After that, all we have to do is to start MSBuild and pass this file name as the parameter.
Configuring Jenkins
That's the most challenging part of the entire setup as it requires combination of all infrastructure components as well as all of the needed components should be properly configured. Nevertheless, a lot of actions are compensated with the fact that there're a lot of Jenkins plugins for almost every case. All description will cover the following areas:
- Installation
- General build flow overview
- Build tasks setup
- Release build setup
Installation
Installation packages can be retrieved from the official Jenkins site. If you are running it on Windows I'd recommend you installing Jenkins as the Windows service at once. If you don't have any security restrictions on the machine and 8080 port is free the installation wouldn't cause any problems. So, let's move further.
Once Jenkins is there we should extend it with various plugins which may be needed. For this purpose we should navigate to Jenkins > Settings > Manage Plugins and choose Available plugins tab. Generally, all you have to do is to set check mark against plugins you need and then click on Install button. The installation will be started.
For my purposes I need the following plugins:
| Plugin | Description |
|---|---|
| javadoc | Publishes javadoc after build is done |
| ant | Integrates with ANT |
| TestNG Results Plugin | Collects TestNG results and publish them with various graphs showing basic statistics |
| Jenkins NUnit plugin | Should be the same as for TestNG |
| MSBuild plugin | Adds the build step running MSBuild command |
| Jenkins Rake plugin | Allows running Rake tasks during the build |
| Hudson Ruby Plugin | Allows writing ruby scripts as build steps |
| Jenkins ruby metrics plugin | Various ruby-related information collection |
| Jenkins GIT plugin | Major plugin for getting sources from GIT |
| Git server plugin | |
| github-api | |
| GitHub plugin | |
| Github Authentication plugin | That may be helpful while integrating with GIT |
| Jenkins Gitorious plugin | |
| Dashboard View | Various configuration for dashboards to view |
| Dependency Graph Viewer Plugin | Provides the ability to build dependency graphs (quite nice, actually) |
| Static Analysis Utilities | Bundles multiple static analysis reports processing |
| Checkstyle Plug-in | Collects and publishes check-style artifacts |
| Static Analysis Collector Plug-in | Bundles multiple static analysis reports processing |
| Hudson global-build-stats plugin | Provides additional option to view entire builds statistics |
| build-metrics | |
| Jenkins Dynamic Parameter Plug-in | |
| HTML Publisher plugin | Publishes HTML reports |
| Jenkins Jira Issue Updater | |
| Jenkins JIRA plugin | |
| Job Revision Plugin | |
| Copy Artifact Plugin | |
| Jenkins Dry Run Plug-in | |
| Version Number Plug-In | That would be needed while configuring build number and archive version to publish |
Jenkins global settings
Once we installed all necessary plugins it's time to set up all global Jenkins settings. For this purpose we should navigate to Settings > Configure System menu from the home page. On the settings page we should do the following:
- Go to Environment Variables section and setup the following variables:
- GIT_HOME - path to the folder containing Git binaries. For me it's: d:\git\bin
- HOME - path to the folder containing SSH keys to authenticate while getting data from Github. It's usually %USERPROFILE%\.ssh path.
- PATH - this variable should be extended with path to ANT and Ruby binaries. For me the value is: %PATH%;D:\ANT\apache-ant-1.8.4\bin;d:\Ruby193\bin
- Scroll down to configuration sections for JDK, MSBuild, Git, ANT, Rake. For all of those section you should perform similar operations:
- Click on Add Installation button at the corresponding section
- Specify the installation name and path
- Under Jira configuration I need to make settings like:

General build flow overview
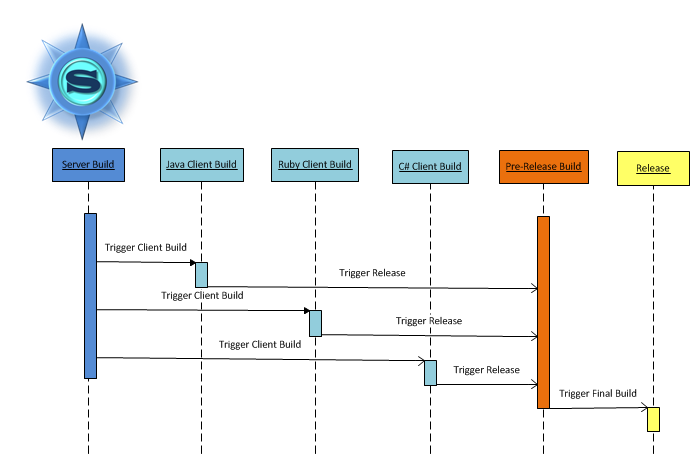
Entire build process has several parts which can be executed separately but they are dependent. Thus, we have server build which can affect all clients. At the same time if we change some client we don't need to check all other build components as they are unlikely affected. So, entire build work flow should be based on the following rules:
- If server build is done all subsequent client builds should be performed
- If we build the client it goes directly to release after successful build completion
Build tasks setup
OK. Finally we're ready to make build tasks. We'll start with the Server side component. For this purpose we should do the following:
- From main page navigate to New Task
- Enter new task name, say, Sirius Server
- Select the topmost radio-button indicating that we're creating free form configuration
- Click OK
- connection to GIT - all credentials required to retrieve source code from GIT repository
- build trigger - the action which should initiate build automatically
- build steps - the actions which should be done during build process (we need to initiate ANT task)
- post-build operations - actions which should be done after build is done (typically it's artifacts collection)
Connection to GIT
Firstly we should define which source control system we should use.
- Under Source Control section we should select Git radio-button
- The extended list of settings will appear. We should fill the Repository URL field. In my case the URL is https://github.com/mkolisnyk/Sirius.git.
- The we click on Extended Options button to expand the list of additional settings
- In the Include field enter expression filtering entire source files. For me it's Server/.*. So, this build configuration will listen for changes under the folders matching that pattern
- Also set Wipe out workspace before build check mark to make clean build every time. This will make our builds running from the scratch
And the most exciting thing!!! That configuration is not far enough for making Git working. I already encountered that problem 2 years ago and described the solution in the dedicated post but when I tried that again recently I didn't make Git working. So, firstly make sure you really followed the instructions from this article and then you should get back to settings form and fill in Config user.name Value and Config user.email Value fields in the extended Git settings with respective values. That should help. At least it helped me.
Build trigger
In order to make continuous integration I want the build started as soon as I commit any changes to repository. For this purpose we should do the following:
- Under Build Triggers section we should select Query SCM for changes radio-button
- The schedule text box appears. We can enter the following text into there: */2 * * * *
Customized build version number
By default Jenkins numbers builds just by it's number which is not very convenient if you want to publish versioned build. Actually, one of the plugins I installed is responsible for version customization. If you install all plugins described in previous chapters you should be able to see Build Environment section and Create a formatted version number checkbox. Set check mark on it to open settings form. I made settings like that:
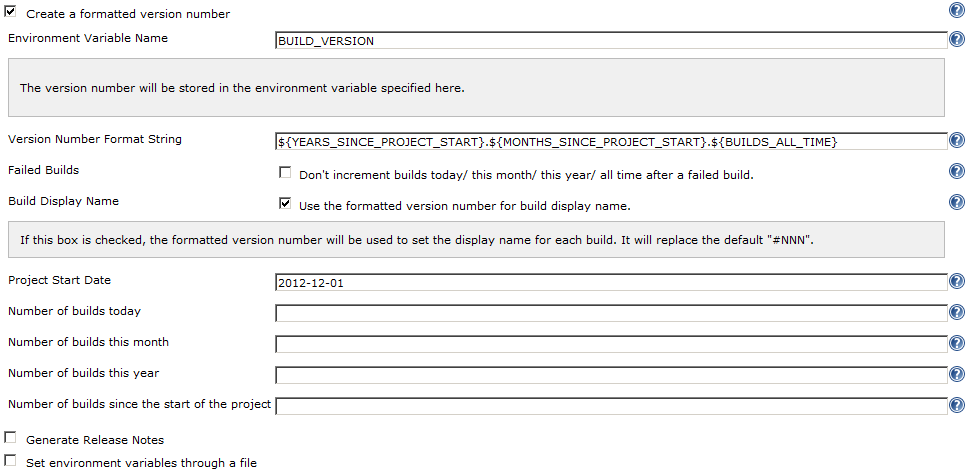
- Number of year since project start
- Number of month since project start
- The actual build number
Build steps
Then we should go to the Build section. Actually we need to make a call of ANT script located at the root location. So, all we have to do is:
- click on Add Build Step button and select Invoke Ant.
- click on Extended Settings button and enter Server/build.xml into Ant Build File field
- In the previous steps we defined the BUILD_VERSION environment variable which should keep version number. Now it's time to pass it into ANT script as the parameter. For this purpose we should fill the Properties field with the following value: package.version=%BUILD_VERSION%. That will make ANT publishing archives with specified version.
Post-build operations
After the build is done we should perform the following operations:
- Publish CheckStyle analysis results - select Add Build Step > Publish CheckStyle analysis results and specify Server/publish/checkstyle-result.xml in the Checkstyle Results field. That's the location where we configured Checkstyle results to be saved to. It was done during ANT script creation
- Publish TestNG results - select Add Build Step > Publish CheckStyle analysis results and specify the file mask where to take TestNG reports from. For me it's the Server\test-output\**\*.xml location.
- Archive artifacts - select Add Build Step > Archive artifacts. According to the build script created in previous chapters after tests are done the packages are stored at the Server\publish\packages\*.* location. That's the value we should specify in the appropriate field.
That's it for Server build. All other components are built in the same fashion with the only difference that for different components the different builder is used and aftifacts are a bit different. But general flow is the same. I actually cloned configurations. So, I won't describe the details for clients.
Release build setup
Eventually, once all components are build they should be stored in some common location. For this purpose we should:
- make sure the artifacts storage location is empty (we should publish only latest versions)
- copy artifacts from the latest successful builds for all components and place them into published folder
- archive files representing them as artifacts
- Command line build step which removes publishing directory. For me it contains only the following command:
del /S /Q release
Further we'll publish results to that folder - Several steps of the Copy artifacts from another project where we define projects to get artifacts from. All of them should contain the following settings:
- Which Build : Latest Successful
- Target Directory : release
- Flatten directories option is checked
So, now we have all necessary build configurations as of now. There would be some improvements in the future but at at the moment we're done with Jenkins configuration.
JIRA set up
If we're running JIRA locally we basically need the following setup:
- Setup JIRA to run as windows service. The only thing I should mention here is that before making such setup you should switch off User Access Control or any other similar monitors to make installation successsful. After that you can turn them back again.
- Optionally you can configure JIRA connection to database because by default it used in-memory DB which is unreliable and we're at risk of losing some data
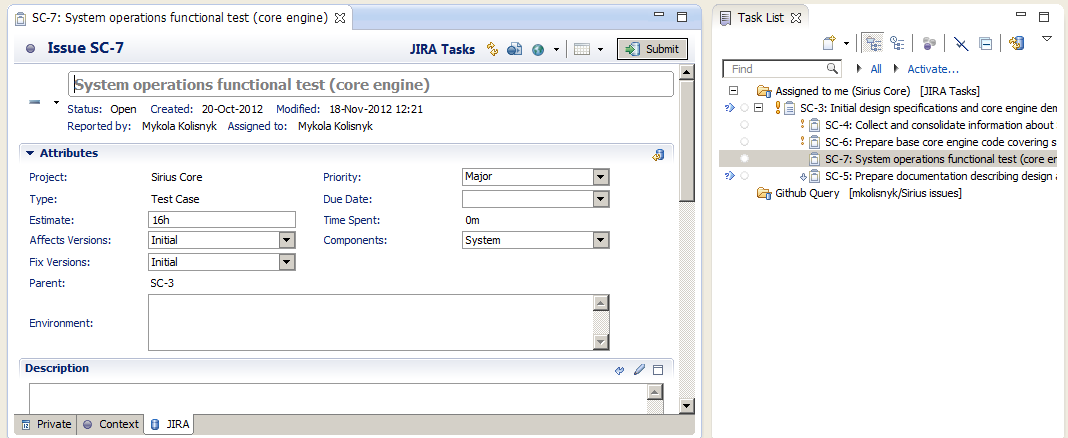
And finally, during Eclipse installation I've installed Jira integration plugin. So, now it's high time to set it up and use. For this purpose we should open the Eclipse and follow the steps below:
- From Eclipse main menu select Window > Show View > Other ...
- In the Views selection dialog select Mylyn > Task Repositories
- You'll see the view like that:

- Risgt click on Atlassian Jira Support item and select Add Task Repository menu item
- You should see the dialog like:

- Select Jira list item and click on Next
- Fill in the form with the information about Jira instance. For me it looks like:

- Click Finish
Afterword
The list of settings isn't complete but I've covered the most essential part I made for environment setup. That's actually the skeleton of the system I'm working with. All I have to do is just write the code, commit the changes, verify results and make fixes. Very convenient!
All right, next step would be a sample functionality showing how the entire system should work, some basic concept of the solution architecture where we'll create server side code with clients on different languages and we'll see how the entire infrastructure works with it.
No comments:
Post a Comment