Since Sirius is going to be used for testing purposes it's not polite to leave it without testing. Major specifics of this solution is that different parts of entire system are written using different programming languages. At the same time all those parts reflect the same functionality. It means that the tests would be the same for all clients. Well, they would be the same for server part as well (at least most of the core tests). It's not very nice to copy/paste them and then migrate to different languages. So, obviously there's going to be a lot of duplicating work. So, I have to do something to minimize that duplication as well as minimize the maintenance effort in case I want to change some tests. It's valid especially for client side as core part doesn't have any local specific logic. All immediate client methods are actually callers for the same server side methods.
So, there's going to be multiple languages but the same interface for tests. It's not trivial solution but I found that.
General approach and testing solution
all right, if will work with the multiple programming languages and we want to have some uniformity at the level of tests we should find the approach which is independent on actual programming language.ideally, that would be some other meta language which then can be transformed or interpreted into the actual.originally, I was thinking about some existing meta languages like T language but for testing purposes that would look like another wheel inventionwhich is not acceptable at the moment.so, I should take a look at some language independent representation of instructions like keyword driven approach or its technical modification which is used under behavior driven context.naturally, such approach provides extra layer for writing instructions and it's not bound to technical implementation.the following diagram shows the entire organisation of testing infrastructure and its mapping to the actual code under test:
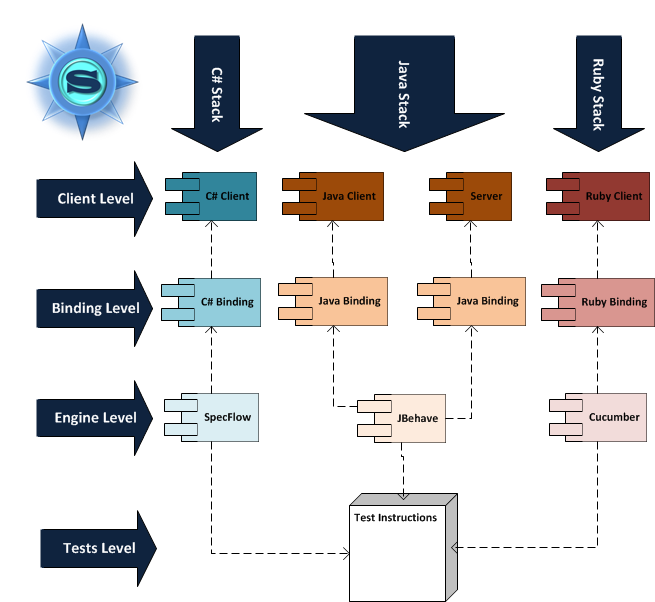
- tests level – the level where the nature language instructions are written.that should be the common level which is independent on the actual programming language
- engine level – the level of test engines which are going to be used to connect test instructions to the actual tests code.it is represented with BDD engine applicable for each particular technological stack.
- binding level – the interim level between code under test and the engine.typically it just an extension of code under test with bindings to natural language instructions.
- client level – the level of components under test.these are the classes created during development and which should be tested.
That's the way I can find uniformity of the testing across multiple programming languages.probably dead can be another one advantage of BDD approach.
Packaging
Another one essential point of entire setup is that how we're going to access the code under test. I mean how do we link our test code to the code we're going to test. Tests shouldn't be in the same project as developed components as they are not the part of final delivery. Also, I don't want to make project dependencies at least within Eclipse as that wouldn't work if I run tests outside development environment. So, the best way to organize such dependency is to make package dependencies. In other words after the build we pack the component and move it into package storage. Then we include the package as the dependency to the test project and use it this way.
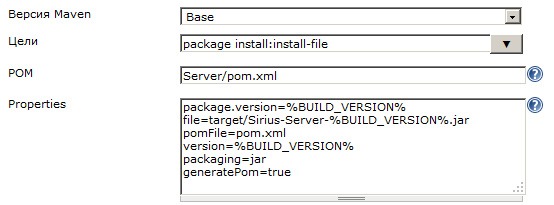
For Ruby and C# it was working initially as we initially made a package as the result of the build process. For Java we should do the same. For this purpose we'll update build configurations to install generated Java binaries as items in Maven repository. So, in order to move binaries to Maven local repository we only should update Jenkins configuration for Server and Java client. The following picture shows updated configuration for Server project:
- install:install-file goal is used instead of just package
- Additional parameters for file installation were added
So, this time all our build configurations have artifacts which can be later imported into test projects.
BDD engines compatibility analysis
At the same time such approach should bring us some restrictions. Since we use multiple engines they may have some gaps in supported features. Some time ago I made comparison between different BDD engines where I prepared some summary table. Here is the part related to the engines I'm going to use at the moment:
| Engine | D o c u m e n t a t i o n | Flexibility in passing parameters | A u t o - c o m p l e t e | Scoping | C o m p o s i t e s t e p s | Backgrounds and Hooks | B i n d i n g t o c o d e | F o r m a t t i n g f l e x i b i l i t y | B u i l t - i n r e p o r t s | Input Data Sources | Overall | ||||||
|---|---|---|---|---|---|---|---|---|---|---|---|---|---|---|---|---|---|
| R e g u l a r e x p r e s s i o n s | T a b l e s | M u l t i - l i n e i n p u t | E x t r a f e a t u r e s | T a g g i n g | S c o p e d s t e p s | B a c k g r o u n d s | H o o k s | E x t e r n a l D a t a | I n c l u s i o n s | ||||||||
| Cucumber | 3 | 3 | 3 | 3 | 0 | 1 | 3 | 0 | 3 | 3 | 3 | 2 | 3 | 3 | 0 | 0 | 33 |
| JBehave | 3 | 2 | 3 | 0 | 3 | 1 | 3 | 1 | 3 | 1 | 1 | 3 | 1 | 2 | 3 | 2 | 32 |
| SpecFlow | 3 | 2 | 3 | 3 | 2 | 3 | 3 | 3 | 2 | 3 | 3 | 3 | 3 | 2 | 0 | 0 | 36 |
| Overall compatibility | |||||||||||||||||
| 3 | 2 | 3 | 0 | 0 | 1 | 3 | 0 | 2 | 1 | 1 | 2 | 1 | 2 | 0 | 0 | 21 | |
From this table we can see that we can easily use features like:
- Tables
- Tagging
- Regular expressions (some simple ones should be fine)
- Composite steps
- Bindings to code
- Build-in reports
- Multiline input (need to check)
- Advanced parameter passing (which is good as it's too dangerous to use some exotics)
- Scoped steps
- External data usage
- Feature inclusions (for our tests it's not pretty much critical)
So, despite some restrictions we can work with common tests definitions.
Sample test scenario
At the beginning I'll try to excercise some simple test scenario to make sure that all mechanics work properly. And then I will expand entire solution to cover all other methods. In previous articles I used the method verifying directory existence. So, I'll add test to them. The scenario is as follows:
Feature: Directory Operations

 Scenario: Directory exists
  Given the "./Test" folder folder doesn't exist
  And the "./Test1" folder folder doesn't exist
  When I create the "./Test" folder
  And delete the "./Test1" folder
  Then I should see the "./Test" folder is available
  And the "./Test1" folder is missing
So, that would be the basic scenario I'll implement using different engines.
Setting up JBehave
Installation
The JBehave binaries can be taken from the official site. However, since we're using Maven for our Java project we can add just another dependency. In the POM file we should add the following section:
   <dependency>
    <groupId>org.jbehave</groupId>
    <artifactId>jbehave-core</artifactId>
    <version>3.7</version>
    <scope>test</scope>
   </dependency>
That should be added into dependencies section. Once we've done it the appropriate binaries will be added.
Additionally, it would be useful to setup JBehave Eclipse plugin which will provide the functionality for story files editor. The oficial update site is http://jbehave.org/reference/eclipse/updates/.
Sample test
The main problem with scenarios creation is that different engines require a bit different format of text instructions. JBehave is among such special engines. Due to local specifics I'll re-write initial test in the following form:
Narrative:
In order to be able to perform various file system operations
As a library user
I want to make sure the directory operations work properly

Scenario: Directory exists
Given the "./Test" folder folder doesn't exist
And the "./Test1" folder folder doesn't exist
When I create the "./Test" folder
And delete the "./Test1" folder
Then I should see the "./Test" folder is available
And the "./Test1" folder is missing
Generally, only heading is different. But anyway, that already makes the unification between multiple BDD engine almost impossible (almost ;-) ).
Project setup
OK. We've added all necessary components. Now we're ready to start working with the project. The following actions must be done:
- Include dependency on component under test
- Create folder structure
- Create class with step bindings
- Create test class and configure step bindings
Include dependency on component under test
For this purpose we should update test project POM.xml file with the dependency on the project under test. Once we're publishing our projects to local Maven repository we can then include them with the following configuration:
   <dependency>
    <groupId>Sirius</groupId>
    <artifactId>Sirius-Server</artifactId>
    <version>LATEST</version>
    <scope>test</scope>
   </dependency>
One thing to be noticed here is that we're taking the most recent version from the local repository. So, we assume that tests will be executed against the freshmost build of server component.
Create folder structure
All the test code will be placed under src/test/java folder. We also should take into account that we have 2 resource types:
- Story files - plain text files containing story definitions
- Step bindings - java files containing step implementations
- core - groups code relevant to core components
- system - groups the code relevant to system operations
- stories - should contain all stories
- core - groups stories relevant to core components
- system - groups stories relevant to system operations
- core - groups stories relevant to core components
Create class with step bindings
For this purpose we should do the following steps:
- Create new class at core/system folder and inherit it from DirectoryOperations class from the Server package.
- Open the generated file and select menu Source > Generate Override/Implement Methods...
- This will open dialog showing the methods to override. Select all methods from parent class and click OK.
- Cleanup the code from generated annotations as they're not needed here
package steps.core.system;

import org.sirius.server.system.DirectoryOperations;

public class DirectoryOperationsSteps extends DirectoryOperations {

 /**
  *
  */
 public DirectoryOperationsSteps() {
  super();
 }

 public boolean createDirectory(String path) {

  return super.createDirectory(path);
 }

 /* (non-Javadoc)
  * @see org.sirius.server.system.DirectoryOperations#delete(java.lang.String)
  */
 @Override
 public boolean delete(String path)
   throws IOException {

  return super.delete(path);
 }

 /* (non-Javadoc)
  * @see org.sirius.server.system.DirectoryOperations#exists(java.lang.String)
  */
 @Override
 public boolean exists(String path) {
  return super.exists(path);
 }
}
The highlighted part is the overridden method which will be used for testing. Why did I do that? Firstly, I don't want to use the code of the system under test directly. Secondly, if server side method changes (some parameters are added or removed) I need to change the code only in one place to make all tests working no matter how much tests should be affected. Well, that a matter of separate article, actually. But for now it's enough to know that it's part of design.
Create test class
For this part I took an examples from JBehave getting started guide. We should create the class which should be treated as the test class where we can apply our step bindings. For this purpose I've added new DirOperationsTest class with the following content:
/**
 *
 */
package core.system;

import java.net.MalformedURLException;
import java.net.URL;

import org.jbehave.core.configuration.Configuration;
import org.jbehave.core.configuration.MostUsefulConfiguration;
import org.jbehave.core.io.LoadFromRelativeFile;
import org.jbehave.core.junit.JUnitStory;
import org.jbehave.core.reporters.Format;
import org.jbehave.core.reporters.StoryReporterBuilder;
import org.jbehave.core.steps.InjectableStepsFactory;
import org.jbehave.core.steps.InstanceStepsFactory;

public class DirectoryOperationsTest extends JUnitStory {

 @Override
    public Configuration configuration() {
  URL storyURL = null;

  try {
   storyURL = new URL("file://" + System.getProperty("user.dir")
           + "/src/test/java/stories/");
  } catch (MalformedURLException e) {
   e.printStackTrace();
  }

        return new MostUsefulConfiguration()
            // where to find the stories
            .useStoryLoader( new LoadFromRelativeFile(storyURL) )
            // CONSOLE and TXT reporting
            .useStoryReporterBuilder(new StoryReporterBuilder().withDefaultFormats().withFormats(Format.CONSOLE, Format.TXT, Format.XML,Format.HTML));
    }

    // Here we specify the steps classes
    @Override
    public InjectableStepsFactory stepsFactory() {
        // varargs, can have more that one steps classes
        return new InstanceStepsFactory(configuration(), new DirectoryOperationsSteps());
    }


}
This is the skeleton class for our tests. Actually, it puts references between text instructions and the code with bindings. The highlighted part shows how such binding is done. Firstly, we specify where we should look for stories. The storyURL variable shows the starting point to search for them. E.g. if our test is defined under com.tests package then the stories would be looked under <storyURL>\com\tests location.
Another thing to be taken into account is the naming convention. Firstly, Maven recogines test classes which names match the following patterns:
Test*
*Test
*TestClass
Also, JBehave finds the correspondence between stories and classes by converting file names from "snake style" to "CamelStyle". So, the directory_operations_test will match the DirectoryOperationsTest class. This is the default convention and actual conversion can be configured but I'll use the default one as I don't want to play too much with each specific engine specifics.
Configure step bindings
The last step here is to make connection between text instructions and the code. Before that we should identify the correspondence between the text instructions and the methods of our test class we have. It can be represented with the following table:
| Text instruction | Keyword type | Method involved |
|---|---|---|
| Given the "./Test" folder folder doesn't exist | Given | delete |
| And the "./Test1" folder folder doesn't exist | Given | delete |
| When I create the "./Test" folder | When | createDirectory |
| And delete the "./Test1" folder | When | delete |
| Then I should see the "./Test" folder is available | Then | exists |
| And the "./Test1" folder is missing | Then | exists |
Delete folder operations are represented with both Given and When statments. So, we should use both forms. That's how we annotate delete method:
 @Override
 @Given(value="the \"$path\" folder folder doesn't exist")
 @When(value="I delete the \"$path\" folder")
 @Aliases(values={"delete the \"$path\" folder"})
 public boolean delete(String path)
   throws IOException {

  return super.delete(path);
 }
Step for directory creation is trivial. There should be only one annotation added. Here how it looks like:
 @When(value="I create the \"$path\" folder")
 public boolean createDirectory(@WebParam(name = "path") String path) {

  return super.createDirectory(path);
 }
For exists functionality there should be some tricks. The only thing to be mentioned here is that all Then methods are usually designed for verifications. So, they should include assertions. At the same time I need to leave exists method as is because we can use it in many different places without any assertions. So, in order to keep the consistency as well as implement required step action I'll add extra method which is just a call of exists method with the assertion. So, the implementation looks like:
 @Override
 public boolean exists(String path) {
  return super.exists(path);
 }

 @Then(value = "I should see the \"$path\" folder is $available")
 @Aliases(values = { "the \"$path\" folder is $available" })
 public void verifyExists(String path, String available) {
  Assert.assertEquals("The '" + path + "' path is not actually "
    + available, available.equals("available"), exists(path));
 }
After that we can run our tests.
The above examples were done for server side code. But the tests for client side are pretty the same. I made copy/paste while making some stuff. Major difference is that for client tests we should additionally start the service. But that would be described later.
Integrating into build
Test execution here is mostly about calling the following command line:
mvn testAdditionally we should collect artifacts from proper place.
So, with this stuff we can update Jenkins configuration. For this purpose we should do the following:
- Clone configuration from existing task (for Server or Java client respectively)
- Navigate to settings and uncheck build trigger by SCM changes
- In the build steps settings update Maven configuration. This time we should call test target and we should update the path to pom.xml file
- Specify the artifacts location to adopt them to the actual tests output
- Save changes
- tests must be triggered after build under test is done. E.g. Server tests are started after Server build is done etc.
- server test build should then trigger builds for Java, C# and Ruby clients
- Java client tests build should then trigger release build
Setting up Cucumber
Installation
Installation is pretty simple. All we have to do is to open command line prompt and enter:
gem install cumumberAdditionally you can setup Cucumber plugin using the update site. That's pretty much it for Cucumber setup.
Project setup
Unlike JBehave, the Cucumber has more complicated requirements for folder structure as there're some special files which should be processed first. And this is controlled by Cucumber itself rather than by means of Ruby interpreter. So, entiry testing project for Ruby client looks like:
sirius-ruby-client-tests
 |
 +-- tests
 |     |
 |     +-- features
 |           |
 |           +-- core
 |           |     |
 |           |     +-- system
 |           |           |
 |           |           +-- DirectoryOperations.feature
 |           +-- steps
 |                 |
 |                 +-- core
 |                       |
 |                       +-- system
 |                             |
 |                             +-- support
 |                             |     |
 |                             |     +-- env.rb
 |                             |
 |                             +-- dir_steps.rb
 +-- Rakefile
Major files here are:
- DirectoryOperations.feature - contains plain text description of test
- env.rb - contains global initialization and assumed to be started first by the engine
- dir_steps.rb - contains bindings between code and text instructions
- Rakefile - major build file which should trigger entire test execution
Sample test
Test scenario
To our luck, the Cucumber supports canonical BDD writing style, so no specific adaptation for feature file is needed. So, all we need is just fill the DirectoryOperations.feature file with the following text:
Feature: Directory Operations

 Scenario: Directory exists
  Given the "./Test" folder folder doesn't exist
  And the "./Test1" folder folder doesn't exist
  When I create the "./Test" folder
  And delete the "./Test1" folder
  Then I should see the "./Test" folder is available
  And the "./Test1" folder is missing
Everything should be accepted fine here.
Global settings
When Cucumber starts it looks for any support folder and runs any env.rb file in it first. So, if we want to make some initialization prior to tests execution we should make it there. In our case we should initialize the object representing directory operations. Also, we should make some inclusions. So, generally, the code looks like:
require 'sirius.rb'
require 'test/unit/assertions.rb'

include Test::Unit::Assertions

DIR_CLIENT = Sirius::Client::Core::System::DirectoryOperations.new
The DIR_CLIENT constant will be used then everywhere where we need to make directory operations within the test.
Step bindings
Unlike JBehave or SpecFlow the Cucumber doesn't bind the text instructions to some specific methods. Ruby gives the ability to bind entire portions of code to some specific regular expression. The file in general is quite uniform which is good from one hand (let's don't talk about the other side for now). So, let's fill the dir_steps.rb with the following content:
Given /the "$path" folder doesn't exist/ do |path|
  DIR_CLIENT.delete path
end

When /create the "(.*)" folder/ do |path|
  DIR_CLIENT.create_directory(path)
end

When /delete the "(.*)" folder/ do
  DIR_CLIENT.delete path
end

Then /the "(.*)" folder is {available|missing}/ do |path,flag|
  assert_equals( flag = "available", DIR_CLIENT.exists(path) )
end
OK. We're done with the test now it can be executed.
Integrating into build
All that's left here is to fill the Rakefile content. We should create one task which should run the cucumber command. So, the file has the following content:
require 'rubygems'
require 'cucumber'
require 'cucumber/rake/task'

Cucumber::Rake::Task.new(:test) do |t|
  t.cucumber_opts = "tests/features --format junit --guess --out results"
end
It will execute tests and produce JUnit like output into results folder.
Entire tests execution should be triggered by the following command:
rake testLocally we have all necessary requisites for that. So it's time to configure Jenkins. For this purpose we should do the following:
- Clone configuration from existing task for Ruby client
- Navigate to settings and uncheck build trigger by SCM changes
- In the build steps settings update build step. This time we should call rake test command as well as we should use sirius-ruby-client-tests folder.
- Specify the artifacts location to adopt them to the actual tests output
- Save changes
- tests must be triggered after Ruby client build is done
- tests build should then trigger release build
Setting up Specflow
Installation
SpecFlow is supplied as the plugin for Visual Studio. Also, it should be mentioned that it isn't a stand-alone solution. From user point of view it's just the generator for NUnit or MSTest whatever you setup in the configuration file (for more details please refer to corresponding documentation page). So, in general I have to setup the following plugins:
- SpecFlow
- VisualNUnit runner
Project setup
First setting we should make here for the project is to include dependant libraries: NUnit and SpecFlow. For this purpose we should use NuGet to upload those dependencies. It can be done via Visual Studio but for continuous integration purpose I have to do this outside the IDE. So, initial settings are:
- I've created Utils folder at the entire solution root where I put NuGet.exe file.
- The new Class Library project was created under {Root}\SiriusCSharp.Client\SiriusCSharp.Client.Tests was added and put into the same solution as the client library
- This test project was updated with the dependency on the client project. Just right-click on References and select Add Refrence menu. Then we should select Project tab and select the client project to make dependency from. Then click OK.
- The test project was updated with 2 files:
- packages.config - file containing packages with version numbers to retrieve by NuGet. For our needs it has the following content:
<packages>
  <package id="NUnit.Runners" version="2.6.2" targetFramework="net40" />
  <package id="SpecFlow" version="1.9.0" targetFramework="net40" />
</packages>
- GetPackages.cmd - batch file triggering NuGet dependencies upload. It's simple and has the following content:
..\..\Utils\nuget.exe install .\packages.config -OutputDirectory .\Packages -ExcludeVersion
@pause
- packages.config - file containing packages with version numbers to retrieve by NuGet. For our needs it has the following content:
- The test project is updated with the following structure:
Sirius.CSharp.Client.Tests
  |
  +-- Bindings
  |     |
  |     +-- Core
  |           |
  |           +-- Sys
  |                 |
  |                 +-- DirectoryOperations.cs
  +-- BuildScript
  |     |
  |     +-- BuildTests.msbuild
  +-- Tests
  |     |
  |     +-- Core
  |           |
  |           +-- Sys
  |                 |
  |                 +-- DirectoryOperations.feature
  |
  +-- App.config
Where:- DirectoryOperations.cs - contains test steps implementations
- BuildTests.msbuild - the main entry point for entire build initiation
- DirectoryOperations.feature - contains text representation of the test
- App.config - contains application configuration. For now it's needed to identify the runner needed by SpecFlow and has the following content:
<?xml version="1.0" encoding="utf-8"?>
<configuration>
  <configSections>
    <section name="specFlow" type="TechTalk.SpecFlow.Configuration.ConfigurationSectionHandler, TechTalk.SpecFlow" />
  </configSections>
  <specFlow>
    <unitTestProvider name="NUnit" />
  </specFlow>
</configuration>
It is actually updated automatically while performing settings related to SpecFlow.
- Last thing we need to add is the dependencies on NUnit and SpecFlow libraries. If we run GetPackages.cmd file created before we'll get new Packages folder where all necessary dlls will be dropped. Actually it also contains some executables we'll use later but now we're interested in nunit.framework.dll and TechTalk.Specflow.dll. We should include dependencies on them.
Build Script
Before starting making tests we should make the skeleton for entire test run. The build script will help us with that. The script skeleton is:
<?xml version="1.0" encoding="utf-8" ?>
<Project ToolsVersion="4.0" DefaultTargets="Tests" xmlns="http://schemas.microsoft.com/developer/msbuild/2003">
  <PropertyGroup>
    <Configuration Condition=" '$(Configuration)' == '' ">Debug</Configuration>
    <Platform Condition=" '$(Platform)' == '' ">x86</Platform>
    <ProductVersion Condition="'$(ProductVersion)'==''">0.0.0</ProductVersion>
    <SolutionDir>..</SolutionDir>
  </PropertyGroup>
</Project>
Actually, we should have 3 major stages:
- Cleanup environment before build
- Project build
- Tests execution
Cleanup action should remove project binaries. It's only the files under bin/<Configuration> so the target has the following content:
  <Target Name="Clean">
    <CreateItem Include="$(SolutionDirAbs)\bin\$(Configuration)\*.*">
      <Output TaskParameter="Include" ItemName="ClientBinaries"/>
    </CreateItem>
    <Delete Files="@(ClientBinaries)" />
    <RemoveDir Directories="$(SolutionDirAbs)\bin\$(Configuration)\" />
  </Target>
Build action is about to run the project build so it's also simple:
  <Target Name="Build"  DependsOnTargets="Clean">
    <ConvertToAbsolutePath Paths="$(SolutionDir)">
      <Output TaskParameter="AbsolutePaths" PropertyName="SolutionDirAbs"/>
    </ConvertToAbsolutePath>
    <MSBuild Projects="$(SolutionDirAbs)\SiriusCSharp.Client.Tests.csproj" />
  </Target>
And finally, we should start NUnit tests. We assume that we've executed GetPackages.cmd batch before and we already have all necessary binaries. So, all we have to do is to call the NUnit command. So the target implementation is:
  <Target Name="Tests" DependsOnTargets="Build">
    <ConvertToAbsolutePath Paths="$(SolutionDir)">
      <Output TaskParameter="AbsolutePaths" PropertyName="SolutionDirAbs"/>
    </ConvertToAbsolutePath>
    <ConvertToAbsolutePath Paths="$(SolutionDir)\Output">
      <Output TaskParameter="AbsolutePaths" PropertyName="OutputAbs"/>
    </ConvertToAbsolutePath>
    <Exec Command="$(SolutionDirAbs)\Packages\NUnit.Runners\nunit-console.exe $(SolutionDirAbs)\bin\$(Configuration)\SiriusCSharp.Client.Tests.dll /work=$(OutputAbs)" WorkingDirectory="$(SolutionDirAbs)" />
  </Target>
This is the skeleton for the build solution. So, now we can create tests to see how it works.
Sample test
OK. Let's create sample test. For this purpose firstly, I'll update DirectoryOperations.feature with the test scenario. SpecFlow supports general format, so test content would be unchanged:
Feature: Directory Operations

 Scenario: Directory exists
  When I create the "./Test" folder
  And delete the "./Test1" folder
  Then I should see the "./Test" folder is available
  But the "./Test1" folder is missing
Then we'll create client wrapper which should wrap the functionality of C# client. For this purpose we'll update DirectoryOperations.cs file with the following content:
using System;
using System.Collections.Generic;
using System.Linq;
using System.Text;
using Sirius.Client.Core.Sys.Dir;

namespace SiriusCSharp.Client.Tests.Bindings.Core.Sys
{
    public class DirectoryOperations : DirectoryOperationsClient
    {
        public DirectoryOperations()
            : base()
        {
        }

        public DirectoryOperations(string endpointConfigurationName) :
                base(endpointConfigurationName)
        {
        }

        public DirectoryOperations(string endpointConfigurationName, string remoteAddress) :
                base(endpointConfigurationName, remoteAddress)
        {
        }

        public new bool delete(string path)
        {
            return base.delete(path);
        }

        public bool exists(string path)
        {
            return base.exists(path);
        }

        public bool create(string path)
        {
            return base.create(path);
        }
    }
}
Now we're ready to apply the bindings. So, updated class with bindings looks like:
using System;
using System.Collections.Generic;
using System.Linq;
using System.Text;
using TechTalk.SpecFlow;
using Sirius.Client.Core.Sys.Dir;
using NUnit.Framework;

namespace SiriusCSharp.Client.Tests.Bindings.Core.Sys
{
    [Binding]1
    public class DirectoryOperations : DirectoryOperationsClient
    {
        public DirectoryOperations()
            : base()
        {
        }

        public DirectoryOperations(string endpointConfigurationName) :
                base(endpointConfigurationName)
        {
        }

        public DirectoryOperations(string endpointConfigurationName, string remoteAddress) :
                base(endpointConfigurationName, remoteAddress)
        {
        }


        [Given(@"the ""(.*)"" folder folder doesn't exist")]
        [When(@"delete the ""(.*)"" folder")]2
        public new bool delete(string path)
        {
            return base.delete(path);
        }

        public new bool exists(string path)
        {
            return base.exists(path);
        }

        [Then(@"I should see the ""(.*)"" folder is {available|missing}")]
        [Then(@"the ""(.*)"" folder is {available|missing}")]
        public void VerifyExists(String path, String available)
        {
            Assert.AreEqual(available.Equals("available"), exists(path));
        }3

        [When(@"I create the ""(.*)"" folder")]2
        public new bool create(string path)
        {
            return base.create(path);
        }
    }
}
So, the updates are:
- 1 - the Binding attribute was added so now SpecFlow uses this class as the source for steps implementation
- 2 - create and delete methods left as is except adding corresponding When attributes
- 3 - exists method doesn't contain verification so we should add wrapper method with assertion
Integrating into build
Entire tests execution should be triggered the same way as for C# client build. For the purpose of the Jenkins configuration we should do the following:
- Clone configuration from existing task for C# client
- Navigate to settings and uncheck build trigger by SCM changes
- In the build steps settings update build step. There should be the following batch:
cd /D SiriusCSharp.Client\SiriusCSharp.Client.Tests
GetPackages
build
- Specify the artifacts location to adopt them to the actual tests output
- Save changes
- tests must be triggered after C# client build is done
- tests build should then trigger release build
Entire build structure
After all Jenkins projects are linked the overall dependencies can be represented with the following diagram:
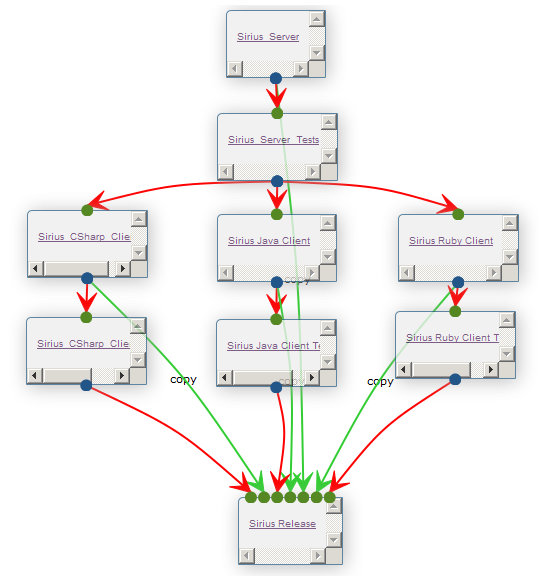
The initial build here is the Server build. It initiates all downstreaming builds. So, once all tasks are done the build is considered to be successful and the Release build is executed. All it does is artifacts collection from upstream builds, in particular it collects packages prepared during previous builds for Server and for all clients. So, actually this build then can publish artifacts to any shared location or resource.
Summary
There have been a lot of work done so far. However, a lot of things left to do. Before moving further we should define what we have done and what we have to do. So, let's make a summary of what has been done and what hasn't. Thus we'll identify where we should go further. All the summary can be represented with the following table:
| What was planned | Done/Failed | What should be done |
|---|---|---|
| Cover all modules with tests | Done | Expand coverage |
| Provide unified interface for tests | Done | Keep working on providing the most universal step definitions to fit all engines in use |
| Provide unified source for tests | Failed | All the tests are still represented with the different sources. Further work on it should be concentrated on finding some common source whare all the tests are taken from to complete the unification. |
Hi Nickolay,
ReplyDeleteI am reading your blog. And I see that you give a very detailed descriptions on Sirius. But the problem is… that tutorials are very detailed. So, I understood that it is some test automation platform that supports multiple languages and BDD frameworks… But, why, for instance should I use it and what benefit will I get?
For instance, if I consider to use Jenkins – then I'll go and find some Jenkins server that works for opensource projects. So that I'll be able to take a first look on the system before I start long installation steps on local workstation.
Do you have some live-demo server or video overview?
Hi Dmitriy,
DeleteThese materials aren't available yet as solution is very raw. Actually, I'm describing it's initial evolution when we rather prepare some infrastructure for development than functional features. But as soon as I reach some readiness I'll look for the ways to share all infrastructure as well as spend more time on writing reference guides. For now, the only shared resource is source code on GitHub: https://github.com/mkolisnyk/Sirius with draft wiki pages.